Talent Finder
Talent Finder is your employee directory. Here you can browse, search and filter your talent pool, then act on it: create succession plans, tag critical roles and high-potential people, and import data in bulk.
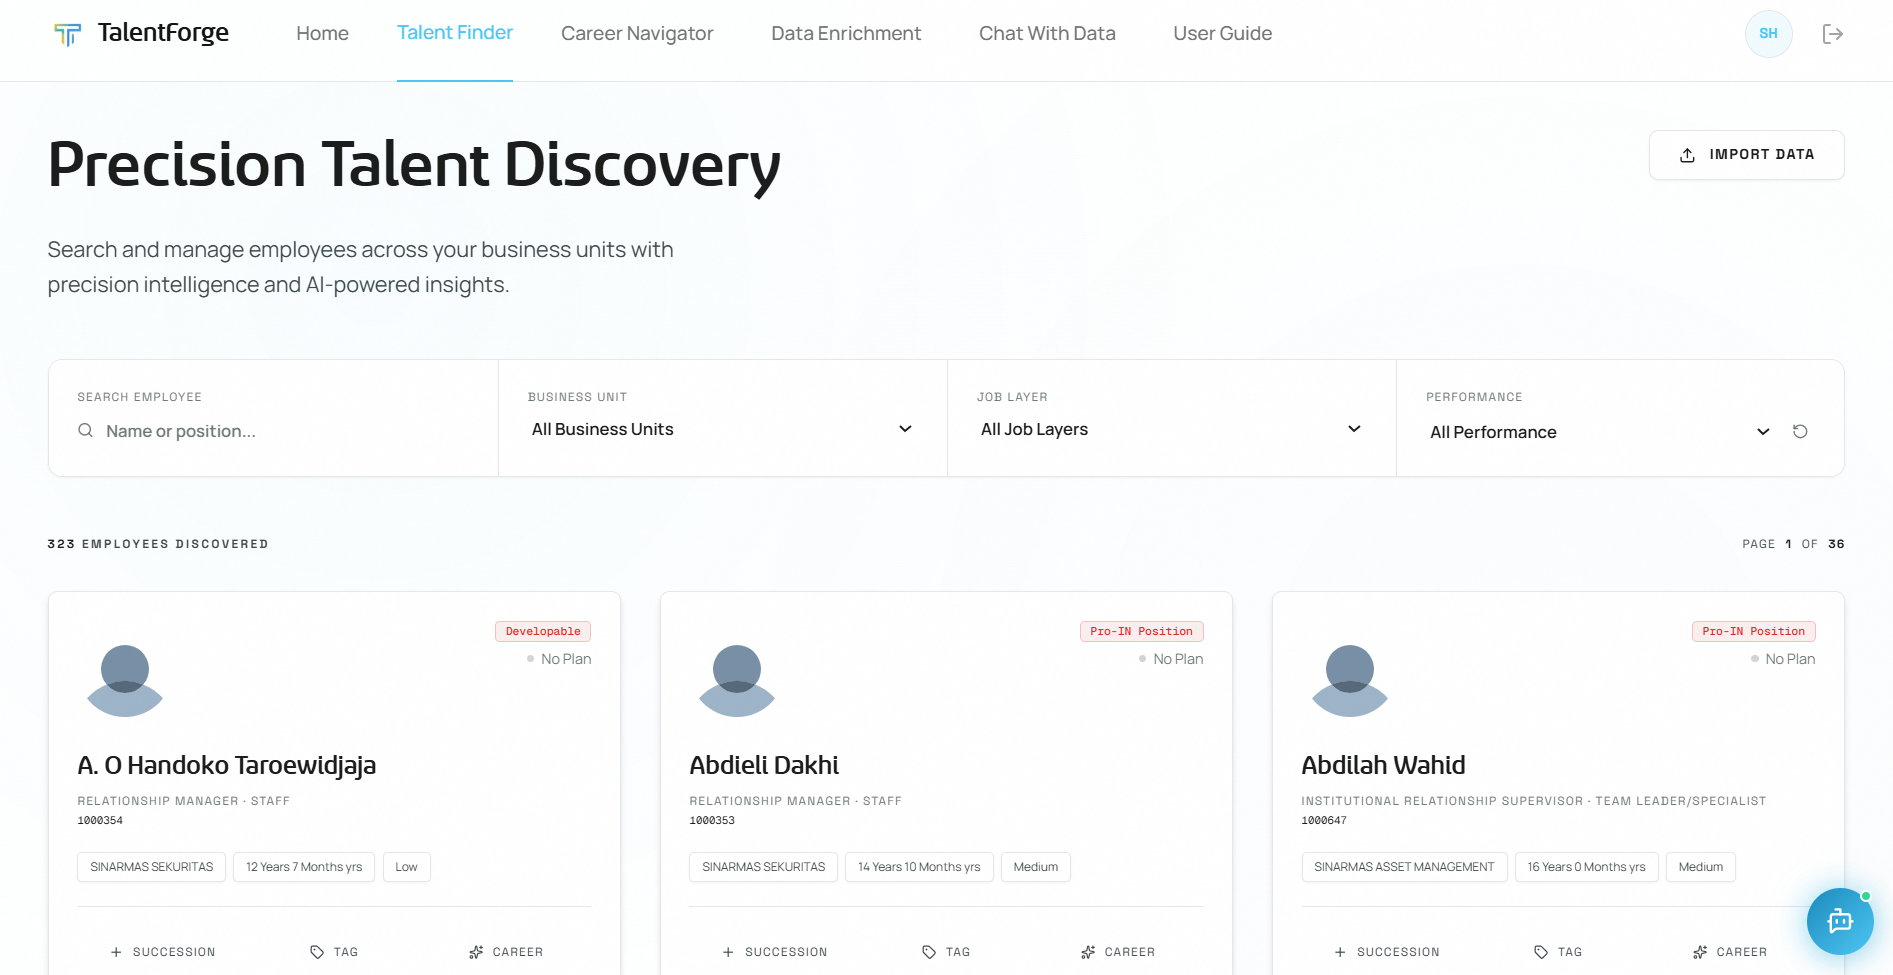
Browsing & Searching Employees
Browsing:
- Employees appear as wide result cards in a single column, 20 per page, with page numbers at the bottom.
- Only active employees in your assigned business units are listed, sorted by name.
- Above the cards you see how many employees match (for example, "323 employees discovered") and which page you are on.
- If nothing matches, the page shows No Results. Check your filters and search text.
Searching:
- Type into the search box at the top of the left filter pane (it reads "Name, position or past role…").
- Results update automatically a moment after you stop typing. You don't need to press Enter.
- The search matches an employee's name, employee ID, current position, and past job titles from their LinkedIn work history.
- When a card matches on a job title from their work history, it shows a Matching experience block. It lists up to four matching roles with company and dates, and your search words are highlighted.
- Clear the search box to return to the full list.
💡 Tip: Work-history search finds hidden experience. Search "data engineer" to surface people who did that job earlier in their career, even if their current title is different.
Filtering
The filter pane on the left has three groups.
| Group | Filter | How it works |
|---|---|---|
| Highlights | Potential Talent | On/off switch. Shows only employees tagged as high-potential |
| Critical Role | On/off switch. Shows only employees tagged as being in a business-critical role | |
| Organization | Pillar | Pick one pillar, or All Pillars |
| Business Unit | Pick one or more of your assigned business units | |
| Role & Performance | Job Layer | Pick one or more layers |
| Performance | Pick one or more performance categories | |
| Talent Class | Pick one or more classes from the talent matrix (see Reference) |
Job Layer values, from junior to senior: Staff, Officer, Team Leader/Specialist, Section Head/Sr. Specialist, Department Head/Expert, Division Head/Master Expert, Group Head, BU / SU Head. You only see the layers that exist in your scope.
- Each group can be collapsed or expanded by clicking its heading.
- Options narrow as you choose. Pick a Pillar and the Business Unit list shows only units in that pillar. Pick business units and the Job Layer, Performance and Talent Class lists show only values found there.
- Changing the Pillar clears your Business Unit, Job Layer and Performance choices.
- Filters combine. An employee must match all of them to appear.
- The Potential Talent and Critical Role switches use the same tags you set with the Tag button on a card.
- Click Reset Filters at the bottom of the pane to clear everything, including the search box.
💡 Tip: Turn on Potential Talent and set Performance to your top categories to shortlist your strongest people for development.
Arriving from the Home dashboard
The Talent Overview on your Home dashboard links into Talent Finder with filters already applied. Grid cells and segment tiles pre-select talent classes. The critical-role block turns on Critical Role.
Selected talent classes, whether chosen this way or in the filter pane, also appear as chips next to the employee count. Click the × on a chip to remove that class.
Common mistakes to avoid:
- Forgetting a filter is still on. If you see fewer employees than expected, check the left pane and any talent-class chips beside the count.
Understanding Employee Cards
Each card is a quick profile of one employee.
| Element | Where it appears | What it means |
|---|---|---|
| Photo | Left | Profile photo. Click it to open the Succession Pipeline panel |
| Name | Centre | Full name. Click it to open the Succession Pipeline panel |
| Position · Job Layer | Below the name | Current job title and layer (for example, "INSTITUTIONAL EQUITY DEALER · STAFF") |
| Employee ID | Below the position | The employee's unique ID |
| Business Unit chip | Chip row | The business unit the employee belongs to |
| Tenure chip | Chip row | Time with the company (for example, "2 Years 1 Month yrs") |
| Age chip | Chip row | Current age, worked out from date of birth. The date of birth itself is never shown |
| Performance chip | Chip row | Current performance category |
| Potential / Critical | Chip row | Shown when the employee is tagged Potential Talent or Critical Role |
| Talent Class badge | Right column | The employee's place on the talent matrix (for example, "Contributor"). See Reference |
| Plan status | Right column | Whether this person is named as a successor in any active succession plan (see below) |
| + Succession | Right column | Opens the Create Succession Plan window, with this employee as the incumbent |
| Tag | Right column | Opens the Tag Profile Criticality window |
| Career | Right column | Opens this employee's Career Navigator page |
Plan status shows one of three things:
- Position Plan (cyan dot): this person is named as a successor in at least one active Position plan.
- 1 Plan, 2 Plans and so on (green dot): this person is named as a successor in that many active plans, none of them Position plans.
- No Plan (grey dot): this person is not named as a successor anywhere.
💡 Tip: A high performer with No Plan isn't in anyone's succession pipeline yet. Consider whether they should be.
Creating a Succession Plan
You create a plan from the card of the person who holds the role today (the incumbent).
- Find the incumbent and click + Succession on their card.
- The Create Succession Plan window opens with the incumbent's name and position filled in.
- Choose a Plan Type:
- Position Plan: a successor for this exact position.
- Role Plan: a successor for the role more broadly.
- In Successor Name, start typing. A list of matching employees appears with their position and employee ID. Click the right person.
- The search works like the main search (name, ID, position or past role) and only covers your business units.
- The incumbent is left out of the list.
- To change your choice, click the reset icon next to the selected successor.
- Choose a Readiness Level:
- Ready Now: can step in immediately.
- Ready 1-2 Years: needs one to two years of development.
- Ready 3+ Years: a longer-term candidate.
- Click Create Plan. The button stays disabled until you've chosen a successor.
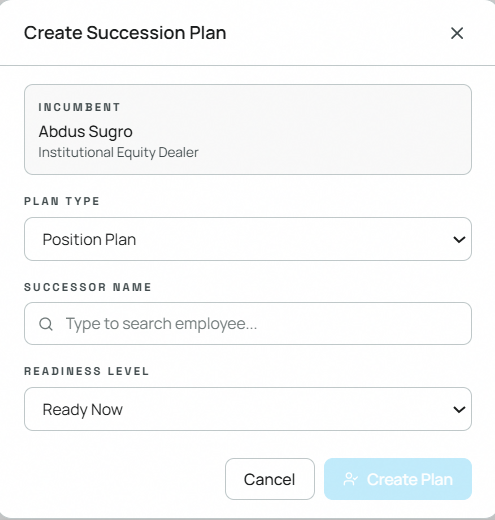
💡 Tip: Each new plan appears in Recent Activity on your Home dashboard.
Common mistakes to avoid:
- Starting from the successor's card instead of the incumbent's. The card you click + Succession on is the person being succeeded.
- Leaving Readiness Level on the default (Ready Now) when the candidate actually needs time to develop.
Managing Successors
To see and manage the successors for an employee's position:
- Click the employee's photo or name on their card.
- The Succession Pipeline panel slides in from the right. It shows:
- the position, with a Critical badge if it is tagged as a critical role;
- the Current Incumbent, with tenure and performance, plus a link icon that opens their Career Navigator page;
- each Successor with photo, position, tenure, performance, readiness level and plan type. Each successor has a link icon to their Career Navigator page.
- To remove a successor, click the trash icon on their card. The removal happens straight away, with no confirmation step.
- Close the panel with the Close button, by pressing Escape, or by clicking outside it.
If nobody has been named yet, the panel shows No Successors.
Tagging Profile Criticality
Mark employees as high-potential or as holding a critical role. This makes them easier to find and feeds the alerts on your Home dashboard.
- Click Tag on the employee's card.
- Tick the boxes that apply:
- Potential Talent: mark as a high-potential individual.
- Critical Role: the position is critical for the organisation. Critical roles count towards the critical-role alert on your Home dashboard.
- Click Save Tags.
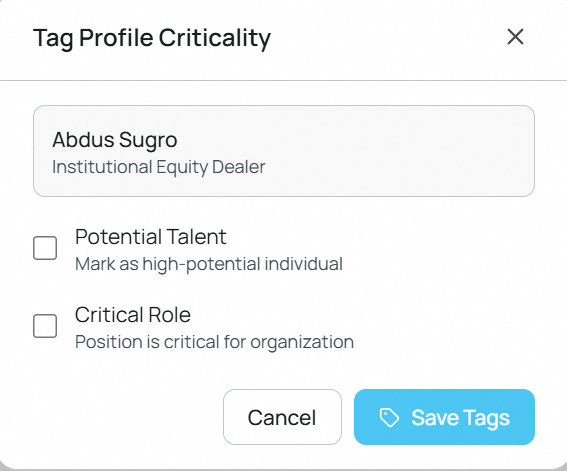
⚠️ Warning: Saving tags marks that employee's AI career paths as outdated. The next time you open their Career Navigator page, the career map is empty until you click AI Recommendations to generate a fresh one.
Importing Data in Bulk
Bulk Import lets you load data for many employees at once from a spreadsheet. There are three import types:
| Import Type | What it does |
|---|---|
| Talent Profile | Adds new employees or updates existing ones, matched on employee_id |
| Development Plan | Adds development plans and their items |
| LinkedIn Profile | Sends a list of LinkedIn profile URLs to be enriched, the same way as Data Enrichment does for one person |
Step 1: Select Type
- Click Import Data at the top right of the Talent Finder page.
- In the Bulk Import window, choose the Import Type.
- The Expected Columns box lists every column the file must contain.
- Click Download CSV Template to get a ready-made file. Row 2 holds hints about allowed values, followed by two example rows.
- Click Next.
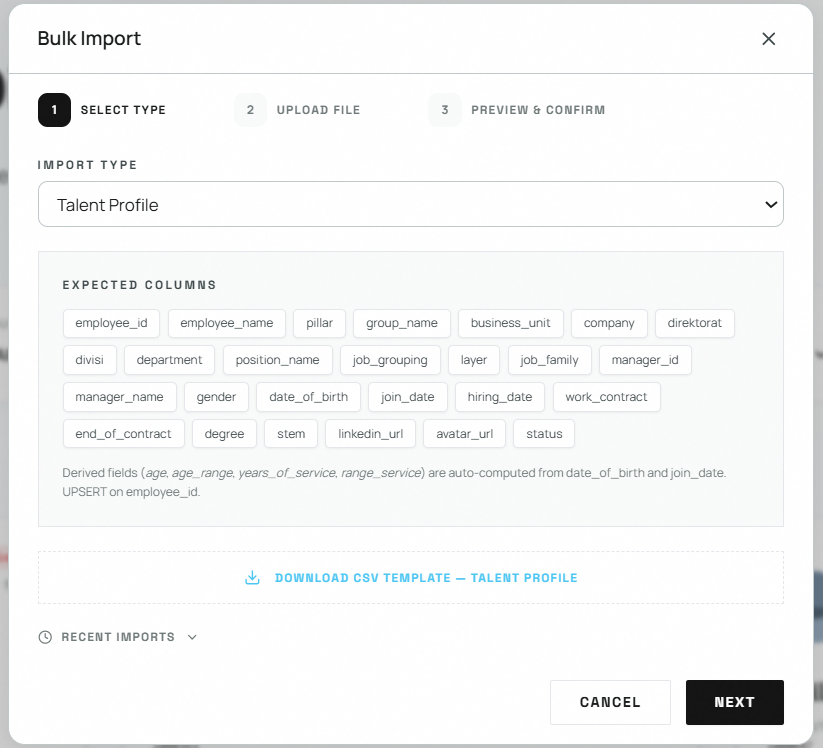
Required values per import type. Every column in the template must stay in the file. Only these columns must have a value in every row:
| Import Type | Required values |
|---|---|
| Talent Profile | employee_id, employee_name, business_unit, status |
| Development Plan | employee_id, plan_title, start_date, end_date, item_title, item_type |
| LinkedIn Profile | personnel_number, employee_name, linkedin_profile_url (business_unit is optional) |
- Talent Profile: age, age range, years of service and service range are worked out for you from
date_of_birthandjoin_date. Values you do fill in, such as layer, gender or degree, must match the allowed values in the hint row. - Development Plan: each row adds one item to a plan. To give a plan several items, repeat the row with the same
employee_idandplan_title. - LinkedIn Profile: up to 1,000 employees per file. Each URL must start with
https://.
Step 2: Upload File
- Drag your file onto the upload area, or click browse.
- Accepted formats:
.csvor.xlsx. Maximum size: 5 MB. - Click Validate & Preview.
Step 3: Preview & Confirm
The system checks every row and shows:
- Total Rows, Valid Rows and Error Rows, plus a Validation Rate bar.
- If any rows fail, a Validation Errors table lists the row number, the column and a plain-language message. Click Download Errors to save the list as a CSV, fix the file and upload it again.
- A Preview of the first valid rows. For Talent Profile and Development Plan, each row is badged New (will be added) or Update (will overwrite an existing record).
💡 Tip: Errors only block the affected rows. Valid rows can still be imported.
Then:
- Talent Profile / Development Plan: click Confirm Import (N rows). You'll see Import Complete with the number of records imported and any rows skipped.
- LinkedIn Profile: click Submit Scrape (N profiles). A progress tracker shows how many profiles are done out of the total. Scraping typically takes 2–10 minutes depending on volume. When it finishes you see Scrape Complete with Total, Succeeded and Failed. If any failed, click Download Failed CSV to get their names and URLs so you can check and resubmit them.
⚠️ Warning: For LinkedIn Profile imports, keep the window open until you see Scrape Complete. If the window was closed before then, submit the file again.
Click Import Another to start a new import, or Close to finish. When you close the window after a completed import, Talent Finder reloads so you see the new data.
Recent Imports
On the first step of the window, click Recent Imports to see your last 10 imports: import type, a short description and the time.
Common mistakes to avoid:
- Leaving the hint row or the two example rows in the file. Delete them and add your own data.
- Renaming or removing column headers. Every header from the template must still be there.
- Using values outside the allowed list. Check the hint row of the template.
- Uploading a file over 5 MB, or more than 1,000 LinkedIn profiles at once. Split it into smaller files.
- Including business units you aren't assigned to. Those rows are rejected.
- Submitting private or deactivated LinkedIn profiles. They come back as Failed.